It is the most common frustration for gamers, VFX artists, and webinar hosts. You buy a green screen, hang it up, turn on your camera, and the result is a disaster. The background flickers, the edges around your hair are fuzzy, and your software struggles to replace the green color cleanly.
The problem isn’t your software; it is almost certainly your lighting. The single biggest mistake beginners make is trying to light themselves and the green screen with the same light source. This never works.
The Golden Rule: Divide and Conquer
To get a professional key, you must treat your subject (you) and your background as two completely separate zones. They require independent lighting setups.
- Separate Lights: If one light hits both you and the screen, you cannot adjust the brightness of one without affecting the other. The background needs to be perfectly flat and even, while your face needs modeling and definition.
- Distance Matters: You must stand at least 1.5 meters (about 5 feet) away from the green screen. If you stand too close, you will cast shadows on the screen, creating dark spots that are impossible to key out cleanly.
How to Avoid “Green Spill”
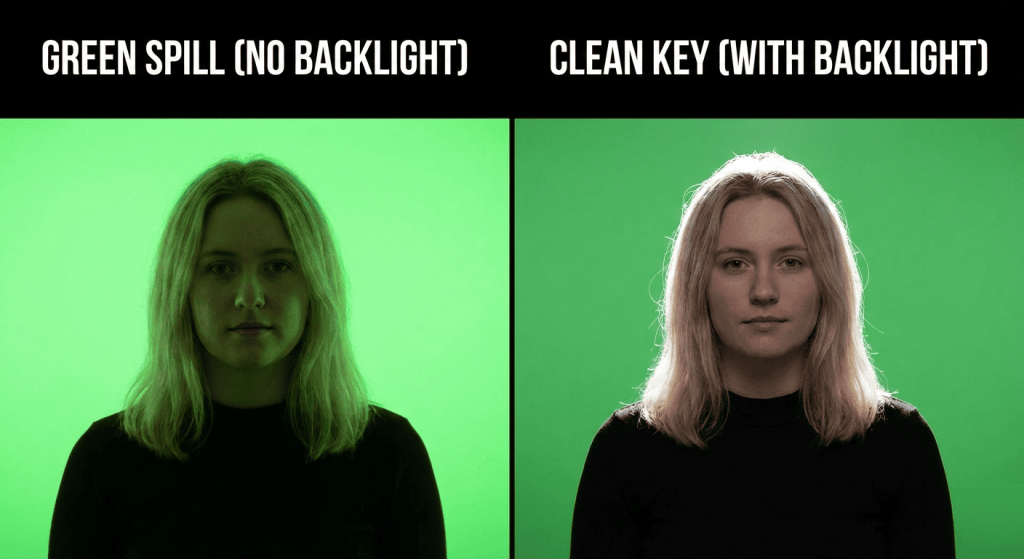
When you stand too close to a brightly lit green wall, light bounces off that wall and hits your back. This reflects a sickly green tint onto your hair, shoulders, and the side of your face. This is called “green spill.”
Software cannot tell the difference between the green screen and the green light on your skin, so it makes parts of you transparent. The solution is twofold: keep your distance, and use a **backlight** (sometimes called a hair light or rim light). Placing a Skytex light high behind you, pointed at your back, creates a bright edge around your silhouette. This white light “cuts” you out from the background and neutralizes the green spill.
The Ultimate Setup: The 4-Light Scheme
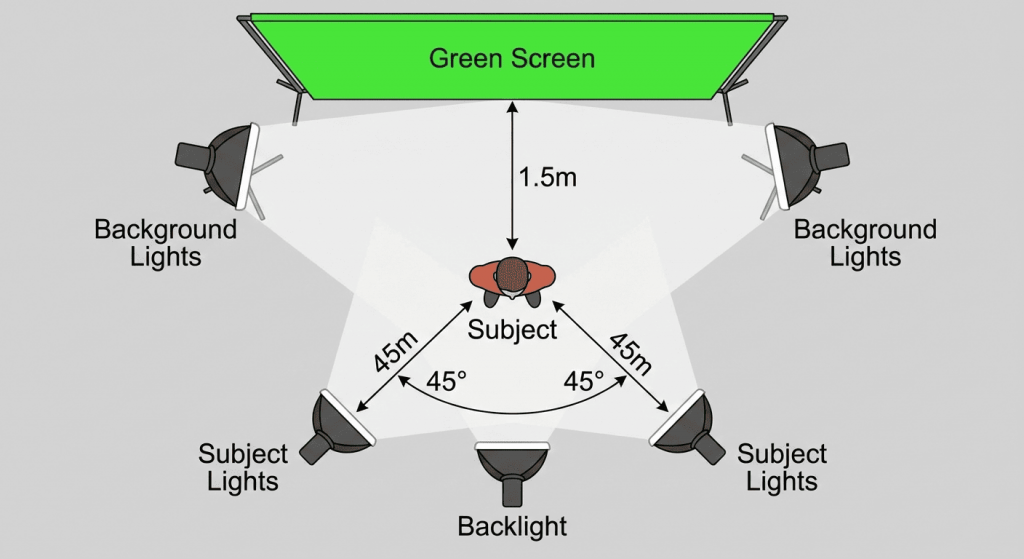
For a flawless, broadcast-quality setup, you need four separate light sources.
- Background Lights (x2): Place two large Skytex softboxes on either side of the screen, angled inward to flood the background with even light. The goal is to have zero “hotspots” (bright white areas) and zero shadows.
- Subject Lights (x2): Use two more lights (your main key light and fill light) in front to illuminate yourself. These should be positioned so no light spills onto the green screen behind you.
Camera and Light Settings
Consistency is vital. Mixing light sources of different colors (like a warm desk lamp and cool window light) will confuse your camera’s sensor, making a clean key impossible. Stick to lamps with a 5500K color temperature. This is pure, neutral white daylight, which provides the cleanest color information for your software to work with.
Final Thoughts
Trying to light a green screen with a single kit is a recipe for frustration. To achieve professional results, you need to separate your background lighting from your subject lighting. For complete coverage and control, we recommend investing in a **Double Kit** setup to ensure you have enough sources for every job.